In the realm of cloud computing and integration, efficiency and clarity in data transformation are paramount. Azure Logic Apps provides a robust platform for automating workflows and integrating apps, data, systems, and services across enterprises. A pivotal feature within this suite is the Logic App Data Mapper, especially when utilized within Visual Studio Code (VS Code). This article aims to elucidate the process of leveraging the Data Mapper in VS Code, enhancing your data transformation tasks with ease and precision.
Prerequisites
Before diving into the Data Mapper, ensure that you have the following prerequisites in place:
- Visual Studio Code installed on a Windows operating system.
- The Azure Logic Apps (Standard) extension installed in VS Code. This extension now includes the previously separate Data Mapper extension, streamlining the user experience.
Steps:
The Data Mapper tool in VS Code simplifies the creation of maps for data transformation. Here’s how to get started:
- Initiate a New Logic App Project: Begin by setting up a new project within VS Code, selecting the appropriate workflow type and defining your project’s structure.
- Access the Data Mapper: Within your project, navigate to the Data Mapper tool. This can be found integrated within the Azure Logic Apps (Standard) extension.
- Define Source and Target Schemas: Select the XML or JSON files that represent the data types you wish to transform. The Data Mapper allows for XML to XML, JSON to JSON, XML to JSON, and JSON to XML transformations.
- Map Your Data: Utilize the drag-and-drop interface to create mappings between your source and target schemas. The tool provides a library of prebuilt functions to aid in creating expressions for your data map.
- Save and Test Your Map: Once your mappings are in place, save your map and test it with sample messages to ensure accuracy.
- Integrate with Your Workflow: After testing, integrate your map directly into your Logic App workflow, either within VS Code or deployed to Azure.
Creating a data map
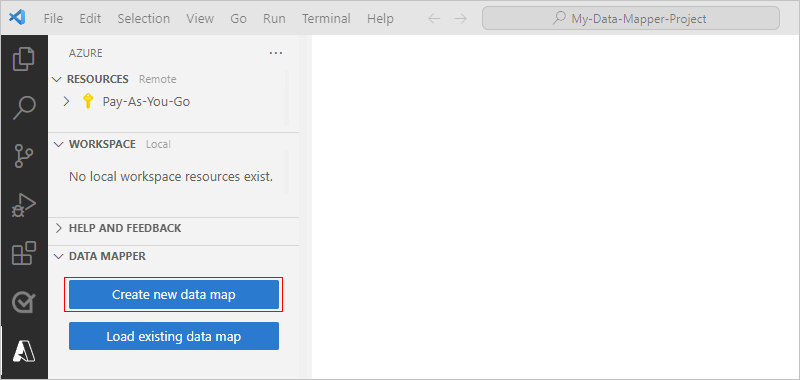
- On the Visual Studio Code left menu, select the Azure icon.
- In the Azure pane, under the Data Mapper section, select Create new data map.

- Provide a name for your data map.
- Specify your source and target schemas by following these steps:
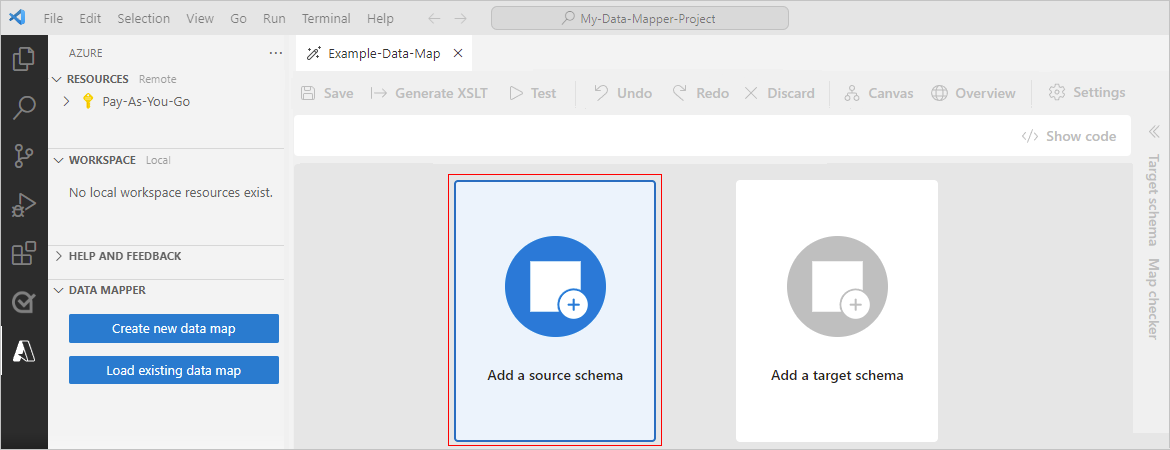
- On the map surface, select Add a source schema.

- On the Configure pane that opens, select Add new > Browse.
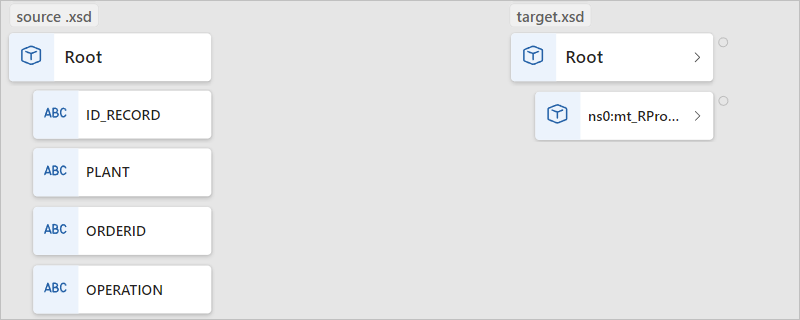
- Find and select your source schema file, and then select Add.If your source schema doesn’t appear in the Open window, from the file type list, change XSD File (*.xsd) to All Files (*.*).The map surface now shows the data types from the source schema. For the examples in this guide,
- On the map surface, select Add a target schema.
- On the Configure pane that opens, select Add new > Browse.
- Find and select your target schema file, and then select Add.If your target schema doesn’t appear in the Open window, from the file type list, change XSD File (*.xsd) to All Files (*.*).The map surface now shows data types from the target schema.

- On the map surface, select Add a source schema.
The following table describes the possible data types that might appear in a schema:Expand table
| Symbol | Type | More info |
|---|---|---|
| Array | Contains items or repeating item nodes | |
| Binary | ||
| Bool | True or false only | |
| Complex | An XML object with children properties, similar to the Object JSON type | |
| DateTime | ||
| Decimal | ||
| Integer | Whole numbers only | |
| Null | Not a data type, but appears when an error or an invalid type exists | |
| Number | A JSON integer or decimal | |
| Object | A JSON object with children properties, similar to the Complex XML type | |
| String |
Create a direct mapping between elements
For a straightforward transformation between elements with the same type in the source and target schemas, follow these steps:
- To review what happens in code while you create the mapping, in the map’s upper right corner, select Show code.
- If you haven’t already, on the map, select the target elements and then the source elements that you want to map.
- Move your pointer over the source element so that both a circle and a plus sign (+) appear.

- Drag a line to the target element so that the line connects to the circle that appears.
 You’ve now created a direct mapping between both elements.
 The code view window reflects the mapping relationship that you created:
Note: If you create a mapping between elements where their data types don’t match, a warning appears on the target element, for example:

Advantages of Using Data Mapper in VS Code
The integration of the Data Mapper in VS Code offers several benefits:
- Unified Experience: The Data Mapper provides a cohesive environment for both mapping and transformation tasks, reducing the need for manual coding.
- Visual Aid: The tool’s visualization capabilities make understanding and editing data maps more intuitive.
- Developer Productivity: Live code changes and breadcrumb navigation enhance developer efficiency, allowing for a focus on specific sections of the map.
- Testing Capabilities: The ability to test maps with sample messages and view outputs streamlines the validation process.
Limitations and Known Issues
While the Data Mapper is a powerful tool, it’s important to note its current limitations:
- It only operates within VS Code running on Windows operating systems.
- The Code view pane of the Data Mapper is read-only, and the layout is automatic and non-editable.
Conclusion
The Logic App Data Mapper in Visual Studio Code is a transformative tool that simplifies the process of data transformation within Azure Logic Apps workflows. By following the steps outlined above and taking advantage of the tool’s features, developers can enhance their productivity and ensure seamless data integration across various platforms.
For those seeking to delve deeper into the capabilities of the Logic App Data Mapper, numerous resources and tutorials are available online, including comprehensive guides on Microsoft’s official documentation and instructional videos that provide step-by-step walkthroughs.
Embrace the power of the Logic App Data Mapper in Visual Studio Code and elevate your data transformation processes to new heights of efficiency and clarity.